

My eyelashes did not impress with their condition or their look. I have to admit that I mainly neglected their care myself. For a long time, I wore lash extensions and used various cosmetics. Now, however, I decided to test the Nanolash Lift Kit. See if I was able to laminate my eyelashes at home and what the results were!
Why did I choose to laminate my eyelashes at home?
As I mentioned, my eyelashes were not in the best condition. Rather, they were short, straight, and thin. I knew that a lash lift could not only lengthen and curl them but also rebuild them. Actually, I got interested in this treatment a long time ago…
However, the prospect of a large expense at a beauty salon was not convincing to me. The moment Nanolash Lash Lift Kit appeared on the market, I decided to order it.
The manufacturer declared that performing an eyelash lift at home is simple and the effect itself can last for up to 8 weeks. If I’m honest, I didn’t quite believe in 8 weeks, because of the condition of my eyelashes. At the same time, since a relatively cheap option for restoring them has appeared, why not give it a go?
Nanolash Lash Lift Kit – first impressions
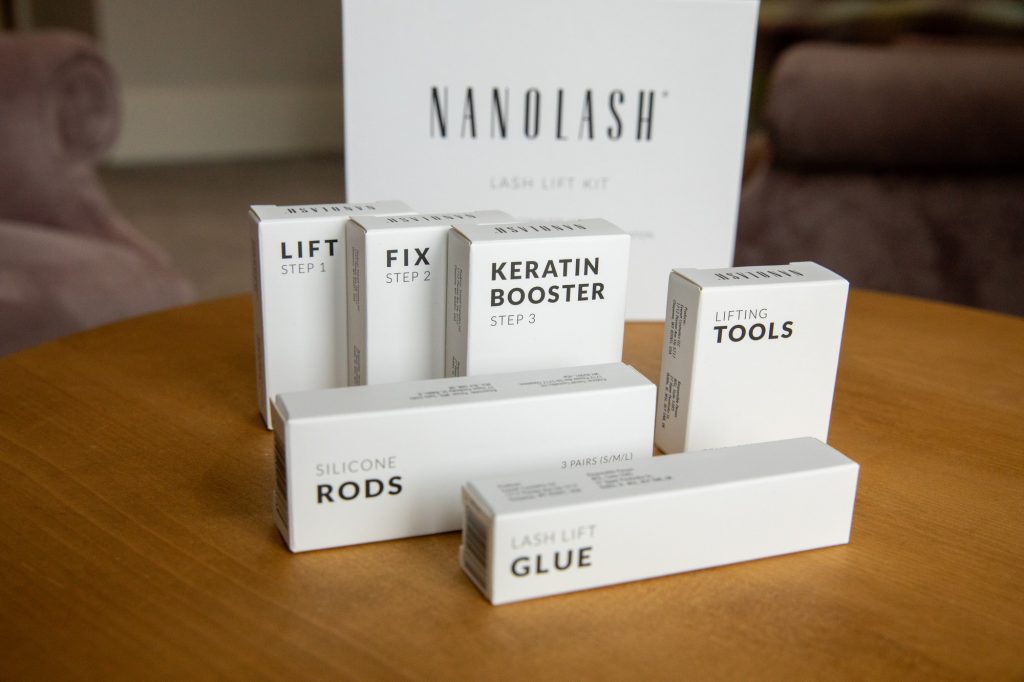
I ordered the Nanolash lift and lamination kit straight from the producer’s website. I immediately noticed the stylish packaging, which I guess has already become a signature of the Nanolash brand. This is not the first product from the brand that I am testing. I have never been disappointed yet.
After opening the box, I found:
- 3 laminating solutions, labeled Lift – Step 1, Fix – Step 2; Keratin Booster – Step 3;
- 3 pairs of silicone rods in 3 sizes from S to L;
- Lash Lift Glue – for fixing the rods;
- other accessories necessary for the amination like applicators.
The thing that surprised me positively is that each product is available in 10 sachets of 0.5 milliliter each. This means that one kit enables you to perform as many as 10 eyelash lamination treatments at home.
The second positive surprise for me was the products’ formulas. The labels show such ingredients as:
- Abyssinian oil;
- grape seed oil;
- avocado oil;
- coconut oil.
I probably don’t need to explain that these ingredients deeply nourish and moisturize eyelashes. They are also responsible for rebuilding their structure effectively. In a word, the Nanolash lash lift kit turned out to be exactly what I expected – premium quality.
First lash lift at home – how did I do it?
I performed the eyelash lift on each eye separately. Since I applied all the products myself, I needed to see what I was doing. I read the instructions included in the package carefully. I found them simple and easy to follow.
I cleaned my lashes, separated the top ones from the bottom ones, and attached the rods. I chose the M size because I wanted a relatively natural curl. I then applied each product in the order it was labeled. I left each one on my lashes for about 7 minutes and washed off the previous one before applying the next one.
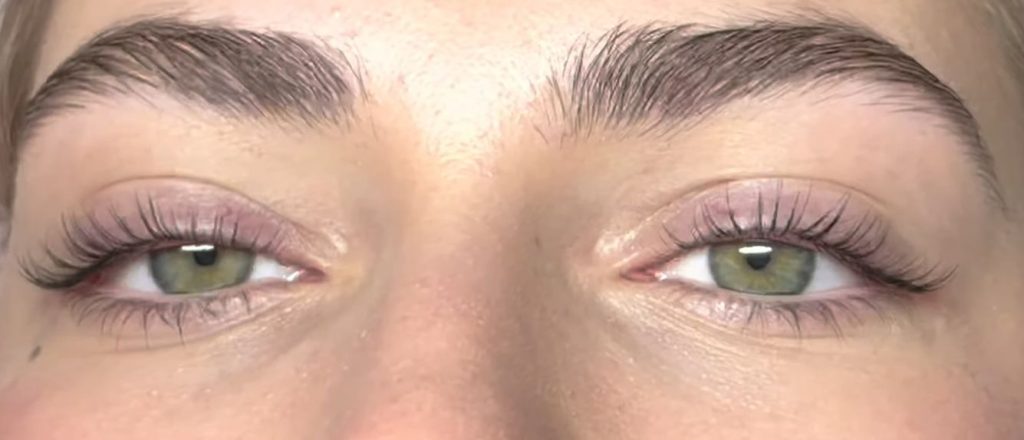
I couldn’t wait to remove the rods. Right after peeling them off, the results were noticeable immediately.
My eyelashes became:
- longer and thicker;
- beautifully curled;
- soft, flexible, and shiny.
Interestingly, the effect itself lasted for about 7 weeks. I think this was due to the poor condition of my lashes. The next time I did the lash lift, the effect lasted much longer.
At-home lash lamination with Nanolash – summary
Of course, I don’t regret doing eyelash lamination at home with Nanolash Lift Kit. My eyelashes have never been so well conditioned and looked so good. The kit is a premium quality product. I can recommend it with a clear conscience to all of you. The effects of the treatment are spectacular and the kit itself lasts a long time.